
This post may contain affiliate links which means I may receive a commission for purchases made through links.
Baseboard heaters have been a very popular heating solution for many homeowners for more than 6 decades now. Unfortunately, most of these systems are now showing various signs of aging like dents, scratches, and rusty spots. Something that makes them look dated and shabby, affecting the overall look of your home. Interestingly, there are various options you can use to modernize your baseboards like painting them. Alternatively, you can opt for alternative methods such as baseboard heat cover replacement.
That’s right! Replacing your old baseboard cover with new pieces of sleek, one-size-fits-all covers is one of the best ways to refurbish old and damaged baseboard heaters. In addition, it’s a relatively easy DIY home improvement project that will only take you a couple of minutes!
Why replace your baseboard heater covers?
Baseboard heaters experience a lot of wear & tear, which isn’t surprising considering they’re installed low to the ground. This exposes them to your home’s daily traffic, causing scratches and dents on them. Also, this subjects them to rust and other harsh elements, making them look appealing. The easiest way to solve these problems is by replacing the covers with a new model. Thankfully, baseboard heater cover replacement is easy enough that you can do it yourself. Besides, in this article, I’ll show you how to install your preferred baseboard cover in your heating system.
In addition to providing an elegant look, baseboard heater covers are safe for children and prevents other baseboard heating dangers. Specifically, the cover prevents children’s fingers from reaching into the heating element. At the same time, it prevents flammable objects like your kids’ toys from getting trapped under or inside the heating unit.
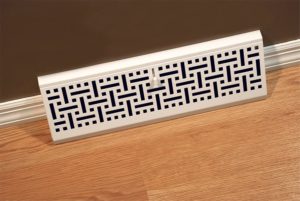
Another interesting feature is that most models are sturdy and can withstand various elements like rust. For instance, some baseboard covers are crafted from 22-gauge perforated steel. In addition, they feature an electroplated galvanized undercoat and an epoxy-based top coat, giving them 2 layers of protection against rust. The perforated steel screen design promotes airflow to the heating unit while keeping it protected.
You’ll also note that most baseboard heater covers have a one-size-fits-all design. They usually measure 3.25” deep, 5.5 – 6.75” tall, and 7.5 – 9” from the floor surface to the top of the heating unit. However, there are premium models that can fit over larger heaters. All in all, it’s important to check the exact size of your heating unit before you buy a baseboard cover. Other than that, these pieces will look great on any type of flooring, including tile, carpet, and wood.
To sum up, if your baseboard heater covers are structurally damaged or cracked, it’s about time that you replace them. Also, you can replace them if your baseboard heater is rusted, scratched, faded, or rusted.
How to install baseboard heater cover replacement (Step-by-Step)
1. Buy a new baseboard heater cover
To ensure a successful baseboard heater cover installation, there are 2 important things you need to consider when buying a new cover. That’s; the type of your baseboard heater (electric or hydronic) and its measurements. Besides, baseboard heater covers are available in different types and sizes.
In terms of measurements, measure the length and depth of the heater. The length refers to how long your baseboard heater extends across the wall, while the width starts from the wall to the edge of the cover. If possible, choose a baseboard heater cover that has a standard size and comes with end caps. However, if you’ve got a non-standard heater, make sure you buy a heater that is compatible with your model.
2. Remove the old baseboard heater cover from the wall
To start, remove the front of the old cover from the heater. Then use a reciprocating saw to cut the cover from the back of the wall. Here, you can put a narrow wood piece between the back of the cover and the wall, and run your saw over the screws attaching it to the wall. After sawing through all the screws, the heater cover will snap free from the wall right away.
3. Remove the adjustable damper
Before you remove the old cover from the heater, remove the adjustable damper running along the top of the back half of your cover. This piece allows you to adjust airflow into the heating unit and usually sits on top of the device’s hangers. Pull it straight up with your hand and lift it free from the hangers.
After removing the damper, wiggle the cover around the heater and push it away from the wall. Put a slotted screwdriver on the bottom of the hanger plates and remove them from the metal cover. Lastly, remove the top of the handle from underneath the lip of your cover.
4. Get rid of the back plate
Carefully slip the back plate up and over the heating unit after ensuring all the hangers are free. Make sure you wear gloves and work carefully to protect yourself from the sharp edges of the back plate. Once the back plate is free, use a vacuum attachment to remove any dirt that may have accumulated behind the heater over time.
5. Attach the new hangers
Now that you’ve completely removed the old baseboard heater cover, start installing the baseboard cover replacement. To do that, slip the new hangers behind your heater until its carrier is popping up the unit. Alternatively, you can move your baseboard heater around until the hangers get in place.
6. Install the new back plate
Use a stud finder to determine the locations of the wall studs, and screw the back plate into the studs. This will prevent the heater from damaging or pulling away from your wall. Now, carefully slip the new back plate into behind the heater and push the top of the handles into the plate’s top edge. Snap the bottom of the hanger into place and use 1.25” rock screws to attach the plate to the wall. Finally, push the end caps into place and snap the new front cover into place!
Baseboard heater replacement cost
The price of replacing a baseboard heater cover ranges from around $40 for a 2-feet long piece up to $120 for a 6-feet section. In addition, end caps start from around $16, and you can also choose to buy outside and inside corners, and coupler pieces. However, the best option is to buy a baseboard heater cover kit instead of buying individual pieces separately. All in all, the actual price of baseboard heater cover will depend on various factors like the type of material used to make the cover, length, and so on. To learn more, check out this review that contains the best baseboard heater covers to help choose the perfect option for your heater.
Conclusion
Overall, baseboard heater cover installation is a simple and low-cost home improvement task that will make a huge aesthetic difference in your house. Moreover, you can put multiple pieces of covers together using a coupler strip if you’ve got a longer heating unit. However, the installation process is almost the same, regardless of the length of your heater.