This post may contain affiliate links which means I may receive a commission for purchases made through links.
 Most people are increasing learning how to install Underfloor heating since it’s seen as a cost-efficient heating method in areas that are regularly freezing. It makes it easy to maintain comfortable temperatures in various rooms like bathrooms and kitchen and doesn’t affect your home’s decor since it’s invisible. In addition, it does not require regular maintenance to work effectively, making it one of the most attractive options for homeowners.
While there are different types of UFH systems, wet underfloor heating is one of the most popular options out there. Thanks to its safety, reliability as well as energy efficiency. However, it can be a bit difficult to install, especially for beginners.
So, how do you install a wet underfloor heating system? Worry not! In this article, I’ll take you the step-by-step guide you can follow to install wet UFH systems, regardless of whether you’re an enthusiastic DIYer or a professional Installer!
How a wet/ hydronic radiant floor heating system works
In essence, a wet UFH system uses a manifold to distribute warm water from the boiler to a series of polythene pipes. However, you can also power the system with traditional heat sources or renewable energy sources like solar panels. More importantly, these systems have to be fitted with a thermostat to help control and monitor the indoor temperature. This plays an important role in ensuring a consistent temperature is maintained throughout the property.
Another benefit of warm water/ wet underfloor heating is that it heats a room much better than radiators. Specifically, a radiator heats the air around and above it to a higher temperature, causing the heat to rise. As a result, the room develops various cold spots, with the floor being the coolest part. On the other hand, gas underfloor heating ensures that heat is distributed evenly, eliminating the issue of cold spots.
What you’ll need for wet underfloor heating system installation
-
Heating manifold
A heating manifold acts as the system’s central hub since it distributes warm water to every UFH zone.
-
Screed
Screed is a smooth type of mortar that is commonly used for flooring and consists of fine sand grains. The smooth texture makes it suitable for underfloor heating as it allows you to place fine layers like tiled floors, carpet, and laminate over it.
-
PEX pipes & AL-PEX pipes
PEX pipes can handle the temperature produced in UFH systems since they can tolerate temperatures of up to 95 deg C. Moreover, they are made from high-quality and durable materials, so they can last up to 50 years.
-
Pipe fixing clips
As the name suggests, clips will help you to secure the pipes when you install them over the underfloor heating insulation.
-
Pipe cutter
A superior pipe cutter helps you to cleanly cut through the piper with a reduced risk of deformation.
-
Pipe re-rounding tool
This tool is used after the pipe has been cut to ensure that the cut end is perfectly spherical so that it can fit perfectly.
-
Tape measure
A tape measure will help you accurately measure the distance between the pipes to ensure uniform distribution of heat across the entire room.
Step-by-step guide on how to install a wet underfloor heating system
1. Clean the subfloor
Most modern pipes designed for hydronic underfloor heating tend to be both tough and durable. However, before you lay them down, it’s important to thoroughly clean the subfloor. This helps to get rid of jagged edges and sharp objects that can potentially damage your pipes. In addition, lay down a damp-proof membrane on your subfloor to prevent dampness and corrosion from happening.
2. Lay underfloor insulation
In addition to cleaning the subfloor, make sure you lay underfloor installation before you install the pipes. This makes the UFH system as beneficial and cost-effective as possible by preventing the heat from going downwards. Better yet, it will reduce heat-up time, helping you achieve significant energy savings and reduce running costs in the long run.
3. Install the heating manifold
As already mentioned, a manifold is a unit that the pipe loop is connected to in a certain room. Therefore, it must be installed first before you lay down the pipe.
With that in mind, look for a suitable location and mount the heating manifold. Basically, you should mount the manifold in a wall that is strong enough to support the unit and the connecting pipes.
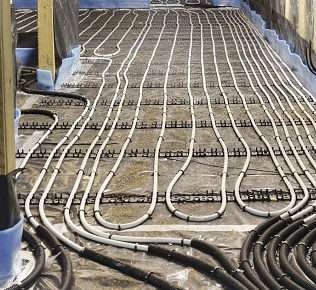
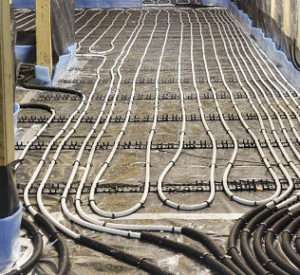
4. Lay the pipe
After installing the manifold, start laying the pipe on top of the flooring insulation starting from the heating manifold to the farthest part of your room and back again. Make sure there is the correct spacing of about 20 cm between each run of piping. Leaving space between the runs ensures that heat is distributed evenly throughout the entire room.
If you’re working in a large room, you may need multiple loops of pipes to cover the whole floor surface. After laying the pipe, use the pipe fixing clips to ensure that it’s properly clipped in. Connect the pipe to the heating manifold and test the system before you move on to the next step. Testing the underfloor heating system will help you to identify any leaks in the joints, pipework, or manifold before you lay the floor screed.
5. Connect the thermostat and boiler pump
Connect the heating manifold to the boiler pump and check if the UFH system is working properly. Lastly, connect the thermostat to your UFH system.
6. Prepare and lay the screed
Before you mix and lay the screed, pressure tests the pipes and ensure they’re full of water. Next, mix the screed or use a ready-mixed self-leveling version and carefully pour it over their underfloor heating pipework. While pouring the screed, ensure the floor insulation is sitting flat and the pipes are securely fastened. Once the screed is stabilized, tamp it to achieve a smooth finish.
7. Allow the screed to dry
Let the floor screed dry for about 7 days before you turn on the underfloor heating system. Once the screen is completely dry, turn on the UFH system and slowly increase it over a number of days.
8. Install your floor finish
Finally, lay your floor finish over the dried floor screed to cover the underfloor heating system. However, make sure the type of flooring you install can withstand the amount of heat produced by the UFH system. For instance, laminate, vinyl, and wood floors can withstand a temperature of about 27 deg C.
Final Word
By following the above steps, your wet underfloor heating system installation will be a relatively simple process. However, make sure you observe the manufacturer’s instructions to help you lay the pipes correctly. If necessary, look for a relevant technician to do the final connection and testing to ensure a faster operational system.