This post may contain affiliate links which means I may receive a commission for purchases made through links.

Crown molding installation adds that finishing and upscale touch to a room. At the same, it adds visual appeal to the room and covers joints and seams where the ceiling and walls come together. Unfortunately, if the inside corners of the room are not angled at exactly 90 deg, your corners will look unprofessional. Similarly, if you use mitered joints for inside corners, the molding tends to open up, revealing an unsightly gap. On the bright side, learning how to cope crown molding will help you avoid all those problems!
Coped joints yield better-looking and tighter fitting inside corners. Not to forget that it’s usually easier to cope inside corners compared to making matching bevel cuts, especially considering that corners are rarely exactly 90 deg.
However, coping trim can be both tedious and difficult due to the complex profile of most crown molding styles. Don’t worry though! In this article, I’ll show you how to skillfully cope the inside corners of your crown molding pieces to make your joints look seamless!
What is a coped joint?
For starters, coping refers to a wood joinery technique that cuts the trim’s profile to fit the pieces snugly together for professional-looking results. Most woodworkers prefer coping over mitered joints when the corners of the room aren’t square and when the molding patterns are larger and more complex.
Unless your walls meet at exactly 90 deg in every corner, a mitered joint will not be tight enough to fit the molding together perfectly. On the other hand, coping removes the excess material behind the edge of a miter cut to butt the molding pieces together. Even better, with a coped joint, you don’t have to cut both pieces at 45 deg, as is the case with mitered joints. Instead, one side of the joint is square cut and rests in the corner, while the other molding piece is shaped (coped) to form a tight joint.
To learn more differences between coping and mitering, check out this coping Vs miter crown molding guide!
Why use coped joints for inside corners when installing crown molding?
Simple miter cuts have several drawbacks, even if you cut your corners carefully and measure accurately, especially since rooms rarely have square corners. On top of that, moldings tend to contract and expand in various seasons or as your house ages. Not to forget that they usually separate at the corners during installation when nailing the moldings to the wall.
Thankfully, a coped joint can help to solve most of these issues as it creates smooth and tight inside corners without any gaps. This eliminates the need to fill up the corners with caulk, which will not look as smooth. In addition, coping crown molding offers the following benefits;
-
Fast & flexible joints
A coped joint can accommodate an inside corner that is up to 2 degrees out of square. Also, it will still close tightly, even if your ceiling doesn’t meet the walls at a perfect 90 deg angle. At the same time, coping is faster and provides tighter joinery than mitering.
-
Coping works better than miter cuts for inside corners
When you cut a 45-deg miter joint on crown molding, it will not close tightly if the walls are not square, forcing you to re-cut the miter. However, you’ll not experience that issue with a coped joint. Provided you know how to cope crown molding, your inside corners will always fit perfectly!
Tools needed to cope crown molding
-
Coping saw
A coping saw with a tightly adjusted frame and a sharp blade will help you create good coped joints. In addition, make sure the coping saw you choose for your project doesn’t have too many teeth. This will allow you to cut through relatively thick crown moldings with ease.
Most crown molding installers prefer to cut the coping joint on the pull stroke (the blade teeth facing the handle). However, others find it easier to cope the joint on the push stroke (blade teeth facing away from the handle). Whichever the case, choose the coping saw you’re most comfortable with. On the same note, it’s good to practice with a small piece of molding first to help you determine the ideal angle to cut at. Besides, this will help you save some material as you learn how to cope crown molding.
-
A power miter saw for crown molding
A power miter saw helps you to make preliminary cuts before coping your piece of crown molding. Alternatively, you can use a chop saw fitted with a crosscut blade, especially if you’re working on a large molding installation project. However, a power miter saw provides better results than a saw and a miter box. In addition, it allows you to make tapered cuts and fine adjustments to help you get perfect miter joints.
-
Pencil
-
Sandpaper, file, or rasp
-
Protective eyewear
For safety reasons, it’s recommended that you wear eye protection when using the power or hand tools mentioned above. Also, always keep your work area safe to avoid potential accidents when working on your crown installation project.
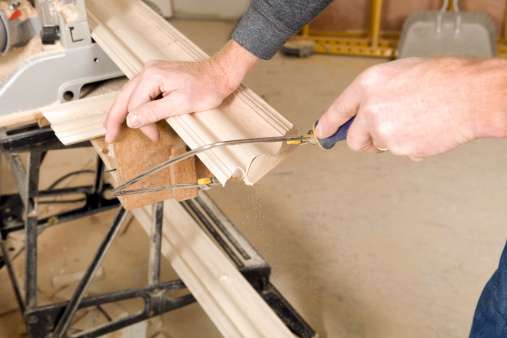
How to Cope Crown Molding with a coping saw
Cutting inside corners with a coping saw is considered the best way to cope crown molding. This is because it doesn’t leave an unwanted gap between the 2 pieces of molding. That said, here are the steps you need to follow when coping crown molding with a coping saw;
-
Make a butt cut on the 1st piece of crown molding
Cutting the 1st piece of molding is the easiest task when making a coped joint. That’s because it involves cutting a straight 90-deg angle on one end of the molding that will butt up against the wall.
So, set your miter saw at 90 deg and use it to make a square/ butt cut on one end of your 1st piece of trim. Once you’ve done that, go ahead and cut & cope the 2nd piece to fit this piece.
-
Make a miter cut on the 2nd piece of crown molding
Take the 2nd piece of crown molding and make an inside miter cut at 45 deg. Assuming you know which side of crown molding goes up, put the molding upside down on a miter saw/ miter box. Secure both surfaces of the trim against 2 faces of the saw, such that one surface rests against the fence and the other rest against the miter saw table. This will give you better control of the trim, allowing you to make an accurate cut.
Now, make a 45 deg inside cut with the miter saw, leaving an extra couple of inches on the molding if it’s your first miter cut. Afterward, you can cut the molding to length once the coping is complete.
-
Highlight the edge of the miter cut with a pencil
Use a pencil to darken the edge of the molding along the profile. This will make it easier to see the edge and act as a guideline when making a miter cut.
-
Make a coping cut
Cut along the darkened edge of the molding profile using a coping saw, angling the sharp blade while following the curved profile of the trim. This will help you remove more of the crown molding material from the back instead of the front of the trim.
-
Sand the edges of the coped cut
Gently smooth down the rough edges of the coped cut you just made using a file, rasp, or 100-grit sandpaper for a perfect fit.
-
Install the molding
Before nailing both pieces of the molding together, hold them in place, up against the ceiling and wall until they fit perfectly. Next, put the 1st piece of crown molding (square/ butt-cut piece) first and nail it. Then butt the coped piece against the square cut molding to form a tight-fitting inside corner joint and nail it as well. Once you’re done installing both pieces the finished joint will look as if you had cut both pieces at a 45 deg angle.
Conclusion
Seeing that crown moldings are larger than other trims and usually installed at a 45-deg angle, they can greatly benefit from coped joints. More importantly, they help to get rid of uneven joints caused by variances in ceilings and walls. So, if you’re planning to handle a large crown molding installation project, I’d recommend that you take your time to learn how to cope crown molding first. Luckily, as you’ve seen, the task isn’t that difficult, especially if you’ve got a good coping saw and the best miter saw for crown molding.
FAQs
1. What angle to cope crown molding?
First, cut a butt joint on the 1st piece of molding. Next, make an inside miter cut at an angle of 45 deg on the piece you intend to cope. After making the miter cut, mark the edge of the trim profile and cope along that line with a coping saw.
2. How to cope crown molding with an angle grinder?
Using a coping saw is the best way to cope crown molding. However, if you don’t have a coping saw, you can use other methods like using an angle grinder. The only issue you may experience with using an angle grinder is that it takes some precision. Other than that, here’s how you can cope your crown molding with an angle grinder;
- Put your molding on the edge of a workbench/ table.
- Hold the angle grinder in one hand and keep the crown molding steady with the other.
- Keep the grinder at a 45-deg angle to the edge of your molding. Gently press it in to undercut the edge, without touching the front of your crown molding.
- Take off about 2.5cm (1”) of material from the molding profile, leaving its front edge intact.