This post may contain affiliate links which means I may receive a commission for purchases made through links.
Crown molding brings personality and elegance to a space while hiding an inferior taping job or cracks in the ceiling. At the same time, it adds architectural character to the room and provides a visual separation between the ceiling and the walls. But, which side of crown molding goes up?
Interestingly, crown molding looks good, regardless of whether it’s installed upside-down or in its usual alignment. For that reason, it can be quite challenging to determine which side of crown molding goes up. However, it’s important to determine which side should be at the top or bottom, especially when making miter cuts for inside and outside corners. This will help you proper cuts and determine the right alignment for your molding during installation.
How to tell which side of crown molding should go up
Pre-made crown moldings are available in different styles and shapes. Nonetheless, there are some general guidelines that will help you determine which end goes on the bottom and which part goes on top.
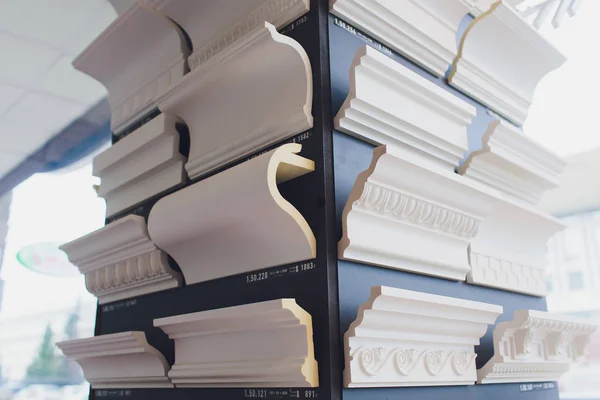
In most cases, one sculpted area of the crown molding is more detailed and compact (decorative side) that the other end (side with less decoration). The end with the highest level of sculpting or detail goes on the bottom. While the other end, which usually has one large wave or curves to it, goes at the top. That way, when viewed from the end or side, the end with the deepest wave/ cove will be facing the ceiling. In short, the decorative trim should face the bottom, while the end with the least amount of detail goes on top!
The same case applies to crown moldings with a simple design. As a result, the less sculpted details should go upwards, while the side with a more prominent design should point towards the floor. In addition, you can determine which side of crown molding goes up by looking at the depth of the waves. The convex part goes up, while the concave end goes down.
Overall, here are some useful tips for determining which side of crown molding is up;
- The rounded (convex) side goes up, while the cove (concave) side goes down
- Shallower groovers should be on the top, while deeper grooves belong on the bottom
- The more detailed side should be on the bottom, while the simpler part is on the top
- Crown molding alignment is in the reverse fashion of baseboards
- Crown molding generally extends further down the wall compared to the ceiling.
How should crown molding be hung?
After determining which side of crown molding should go up or bottom, the next step is to install it against the wall and ceiling. However, if you’re a beginner, you probably don’t even know how to hang it. Well, here are the steps you need to follow to ensure you hang crown molding correctly!
- Pick up the crown molding piece you want to install and hold it horizontally in your hand. Make sure the molding is at least 3.5” wide or check out this post on crown molding sizes to see if the piece is suitable for the room you’re working on. Feel the top & bottom of the molding to determine its thicker side.
- Put a ladder near the wall you’ll be installing the molding. Climb up the ladder and put the molding in the 1st corner of the room. Place the thinner side of the molding on the ceiling and the thicker side against the wall.
- Hold the crown in place and verify that the side against the ceiling has less decoration (probably one smaller line running across the molding) and the side against the wall is more detailed. If the piece has been aligned appropriately, go ahead and follow the other steps of crown molding installation.
Final Word
When learning how to cut crown molding, you’ll notice that most professionals recommend putting it upside down in the miter saw. That way, the more detailed side (bottom side) will stand up against the fence on the back of your crown molding miter saw. Slide the molding into the miter saw, cut like any other type of trim, flip it over, and install it with the right side up.
It’s also worth mentioning that crown molding will vary depending on the style. However, the thinner side is always installed on the ceiling to become the top side, while the thicker side is installed against the wall to become the bottom side!