
This post may contain affiliate links which means I may receive a commission for purchases made through links.
Crown molding adds a decorative accent and increases the visual appeal to any home’s interior. Plus, there are various crown molding materials to choose from, depending on your home design and preferences. At the same time, it’s important to consider the crown molding’s spring angle you want for your design when choosing a particular style.
If you’re a beginner woodworker, you probably have no idea what that is, right? Worry not! In this post, I’ll tell you what is the spring angle on crown molding. Moreover, I’ll show you why determining the spring angle is an essential part of the crown molding installation process.
What is crown molding’s spring angle?
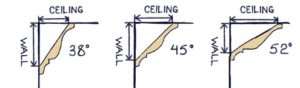
Spring angle refers to the angle formed from the back of the molding to the wall. To measure the spring angle, firmly hold the crown molding piece against the wall and measure the angle from its back to the wall.
This angle is a crucial indicator of the design of the crown molding that is usually produced by manufacturers. More importantly, it’s important to know the crown molding’s spring angle to choose the correct setting on your miter saw or table saw. For instance, if you set your saw for a miter cut following an incorrect spring angle, the crown molding pieces will not fit together properly. As a result, you’ll end up with wasted crown molding or large gaps that need to be filled/ repaired.
It’s also worth mentioning that spring angles for crown molding are available in various sizes depending on the design. The most common options are 38 deg, 45 deg, and 52 deg, measured from the bottom of the molding to the wall. However, you can customize the spring angle of your crown molding to meet your needs.
How to determine crown molding spring angle
Before you undertake any crown molding installation project, it’s always important to determine the spring angle of the pieces you’re working with. Using the wrong spring angle can lead to various problems during installation. For instance, if there is a slight difference in the angle, the molding will not align properly.
Interestingly, there are a few methods you can use to determine the spring angle. These methods include;
Method 1: Using a specialized digital angle finder
First, cut a small section of molding that you’ll use to measure the spring angle. Then draw a straight line on a piece of paper or table to represent a wall. Next, measure how far out the top of the molding reaches.
When measuring the spring angle of crown molding, there are 2 angles that typically need measurement. The 1st number represents the top angle, while the 2nd one represents the bottom angle of the crown molding.
A protractor or digital angle finder helps you to measure both angles. However, if you don’t have a digital angle finder, put the cut piece of trim into the crotch of a framing square and check where the ends meet to find its spring angle. If both ends of the molding have the same measurement, then the spring angle is 45 degrees. But if the numbers are different, the trim has a spring angle of 52 or 38 degrees.
Method 2
The easiest method of determining the crown molding spring angle is to hold the cut piece against the wall and ceiling. While doing so, make sure you hold the piece in the correct installation position, by checking what side of the crown molding goes up or bottom.
Still holding the piece of crown molding in place, measure the distance from the wall to where the back of the trim meets the ceiling. Next, measure the distance from the ceiling down to where the other end of the crown molding meets the wall.
Now, assess these measurements and use them to determine the spring angle of the molding. If the first measurement (on the ceiling) is the longest, then your molding has a spring angle of 52 deg. However, if the measurement on the wall (2nd measurement) is the longest, your molding has a spring angle of 38 degrees. On the other hand, if both measurements are the same, the molding has a spring angle of 45 deg.
Why it’s Important to Calculate the spring angle before crown molding installation
Now that you know how to find the spring angle of crown molding, why is it important? H
For starters, when making miter cuts for inside corners, you have to adjust your miter saw to account for the spring angle.
Secondly, since most corners meet at about 90 deg, you have to adjust the bevel and miter cut depending on the spring angle. So, if you want to make a 90 deg cut, you have to adjust your compound miter saw accordingly. For a 52/ 38 spring angle, you should set the bevel at 33.9 deg and miter at 31.6 deg for a perfect cut. And for a 45 deg spring angle, you should set the bevel at 30 deg and miter at 35.3 deg. Thankfully, the guides of most modern compound miter saws come with these settings.
Lastly, crown molding involves cuts for other angles like 135 deg and 157.5 deg apart from 90 deg corners. In that case, determining the crown molding spring angle will ensure that your cuts are always accurate. However, make sure you measure the angle of the corner you’re working on before you cut the molding.
Conclusion
Overall, the spring angle is an important measurement for any crown molding installation project. For that, you might have trouble installing crown molding correctly if you don’t know how to find the spring angle. But once you do, the installation process will be stress-free and your cuts will be accurate!